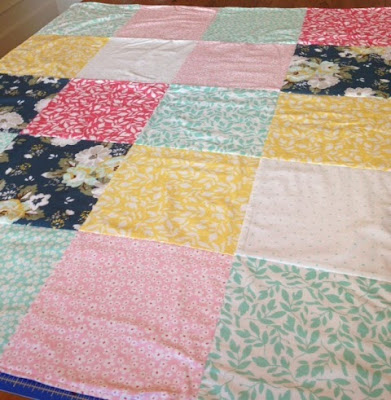
Learn how to make a patchwork quilt with this tutorial! Simple enough for beginners familiar with basic sewing skills.
 |
| Summer Patchwork Quilt in Wiltshire Daisy & Primrose Garden |
Grab some great fabric and let's get started!
- 20 10-11" fabric squares OR
- 1/3 yard 44/45" fabric of 5 or more fabrics (Quilt Front / Blocks)
- Woven Cotton or Flannels work best; though, not too stretchy knits could work also
- If you use fewer than 5 different fabrics, more than 1/3 yard of each will be required
- 1 1/2 yards 44/45" coordinating fabric (Quilt Backing)
- 1 1/2 yards 44/45" batting or flannel (Quilt Lining)
- Quilting tools - cutting mat, ruler and cutting wheel
 |
| Wiltshire Daisy - Blue Floral |
 |
| Primrose Garden - Aqua |
Getting Started - Wash & dry the fabric
As all fabric shrinks some in the wash, you may want to pre-wash to ensure the final quilt is the size you intend. I also like to press my freshly washed fabric before cutting.
Note: With clothing, fit is critical, so pre-wash is essential. Not so with a patchwork quilt, so I skipped this step & love it!
'Pattern' Layout & Cutting:
It's good to first settle on the size of quilt you'd like. The one pictured is about 40" x 50", and is made with 4 rows of 5 squares. I chose 7 prints from 2 Carina Gardner collections - Primrose Garden and Wiltshire Daisy and used 20, 11" squares to achieve the finished size after seam allowances.
Once settled on the overall quilt size & square size, cut out your squares.
1) Cut an 11" strip from each fabric.
2) Then, cut each 11" strip into multiple 11" squares. Be sure to cut very straight lines to ensure your block seams will align. (Figure 1)
 |
| Figure 1 - 11 Inch Squares - 20 in all |
3) Layout your blocks in the pattern you like (Figure 2). I used 4 rows of 5 blocks each - you can use whatever size & pattern you like. This is where you can use your own creativity! Try a checkerboard pattern with 2 contrasting fabrics, or mix it up with squares of 20 different prints. No matter what you choose - make something completely your own!
 |
| Figure 2 |
Quilt Batting & Backing:
Assembly:
Just 5 simple steps!
1) Create each row
2) Piece together the rows
3) Cut out the batting & backing
4) Attach the batting & backing
4) Attach the batting & backing
5) Topstich & create the quilting, by sewing the seams in place
1) Create each row
Now that you've laid out the squares in the design you like, create each row by pinning each square right sides together (RST) and stitching, using 1/2" seam allowance. (Figures 3 & 4) Be sure to keep the squares in the direction you chose when you laid out the squares.
If you're using a standard machine rather than a serger, finish your seams to ensure greater wear.
If you're using a standard machine rather than a serger, finish your seams to ensure greater wear.
 |
| Figure 3 |
 |
| Figure 4 |
2) Piece together the rows
With your rows assembled, place each row together in the design you chose. Be sure to match the seams of each square to create a uniform look.
TIP: Be sure to keep the seams of each row facing the same way to ensure they lay flat.
Connect the rows by by pinning each row right sides together (RST) and stitching, using 1/2" seam allowance. (Figures 5, 6 & 7) Be sure to keep the squares in the direction you chose when you laid out the squares.
If you're using a standard machine rather than a serger, finish your seams to ensure greater wear.
 |
| Figure 5 |
 |
| Figure 6 |
 |
| Figure 7 |
Place your batting out flat, and your backing out flat on top, right side up. Place the quilt right side down, so that the quilt & backing are right sides together (RST), over the backing. Cut the batting and backing to size, by using the quilt as a guide (Figure 8).
Now all 3 pieces of your batting, quilt & backing are together. (Figure 9)
 |
| Figure 8 |
4) Attach the batting & backing
Pin around all 4 sides of the quilt and stitch, leaving an opening about 5-8" on one side. This will be used to turn the quilt. (Figure 10)Use 1/2" seam allowance. If you're using a standard machine rather than a serger, finish your seams to ensure greater wear.
 |
| Figure 10 |
5) Topstitch & create the quilting
Turn the quilt right side out & press. Press under the seam allowance of opening.
Pin around all 4 sides. Pin together all three layers of the quilt (quilt, batting & backing) along the row & column seams. (Figure 11)
 |
| Figure 11 |
Topstitch around all 4 sides. I stitch from the right side, using my presser foot as a guide to be sure I keep the stitch narrow and straight.
Next, stitch along each row and column stitch line; this is called 'stitch in the ditch'. (Figure 12)
And, enjoy your beautiful creation!
 |
| Figure 12 |
And, enjoy your beautiful creation!
 |
| Patchwork Quilt in Primrose & Wiltshire Daisy |
Try this will all different kinds of fabric for completely different looks! Here's one I made in a fun summer line - Sunsational, by Maude Asbury from blend fabrics. Super fun for summer!
 |
| Summer Lap Quilts |


No comments:
Post a Comment