

Want to add a little personality to a toddler or pre-schooler's room? Or, not sure you like any of the ready-to-made crib sheet options? Make your own! 2 yards of your favorite cotton, flannel or not-too-stretchy knit and an hour or 2 of your time, and there you are!
What a fun add to a toddler's room!
I have a climber on my hands, so my daughter has been in a toddler bed for some time! At first, the babyish crib sheets worked well, as only slight changes were made to her room. But, now that she's older, she's craving putting her own personality to her room. So, we started with custom sheets - they're so easy! And, as a bonus, these same sheets work well for her naptime cot at pre-school. They'll get plenty of use!
Things you'll need:
- 2 yards 44/45" fabric woven cotton, flannel & not too stretchy knits work best
- 2-3 yards 1/4" elastic (I used ~80") I found this width ideal for easy stretch for quick sheet changes; you can use wider or more narrow elastic if you have some on hand; you'll just need to adjust the casing size
Getting Started - Wash & dry the fabric
As all fabric shrinks some in the wash, pre-washing for crib & toddler bed sheets is so important! You want them to be just the right amount of snug - to fit the mattress just right, without making changing a chore.
I also like to press my freshly washed fabric before cutting.
'Pattern' Layout & Cutting:
Just 1 simple rectangle!
 |
| Figure 1 |
 |
| Figure 2 |
1) Cut a 44-45" by 66-68" piece of fabric:
After washing, my fabric width was 44". To make cutting easier, I used my cutting board with built-in rulers & cutting lines. Fold the fabric with selvage ends together (Figure 1), lay out the fabric lengthwise with the folded edge along the ruler on the lower edge, and cut on the 66, 67 or 68 inch mark. (Figure 2)
 |
| Figure 3 |
This is what creates the 'pocket' for the mattress corners. With a tip, it's pretty simple.
TIP: If you've cut your rectangle as I did above with the selvage ends together, you'll want to fold it in half again, this time cross-wise. Now you'll have a smaller rectangle, measuring about 22-22.5" by 33-34", with 4 layers of fabric.
Cut an 8" square from the corner with no folded edges. (Figure 3) In this figure, I've re-arranged the folded fabric with the selvage on the left ruler and the cut edge on the bottom ruler. Then I'm able to cut straight lines for each side of the square.
TIP: Be sure you're cutting from the corner with NO FOLDED EDGES. Otherwise you'll end up with a big hole in the middle of your fabric :).
Assembly:
Just 4 simple steps!
 |
| Figure 5 |
 |
| Figure 4 |
1) Create the corners:
Unfold your fabric and bring the right sides together for each of your corners. (Figure 4)
Sew, using a 1/2" seam. If you're using a traditional sewing machine, be sure to finish the seam to be sure it holds up to plenty of washing! (Figure 5)
 |
| Figure 6 |
The resulting corner should look like this - Figure 6.
2) Create the casing:
I prefer a finished look to the sheet's edges. To do this, create a casing for the elastic. If a finished look isn't all that important, look for my TIP on how to use fold-over elastic in a subsequent post, for an even faster way to finish the sheet.
 |
| Figure 7 |
 |
| Figure 8 |
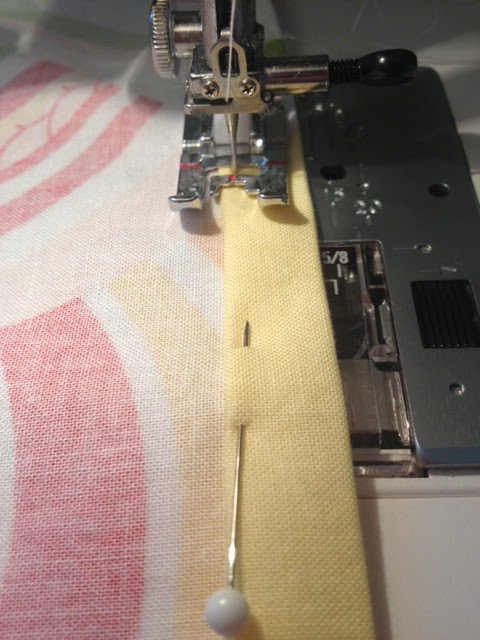
First, fold under the edge of the sheet about 1" all the way around and press (Figure 7).
TIP: I like to start with one of the selvage sides, to be sure I'm folding under enough to hide the fabric labeling.
For the finished look here, you can fold under again & press all the way around, or do as I do - folder under again just where you'll start & finish the casing & pin (Figure 8). Then, I do the additional fold under as I'm sewing the casing.
TIP: Be sure to mark where you'll stop the casing seam, to allow an opening to thread the elastic. (Also Figure 8)
 |
| Figure 9 |
 |
| Figure 10 |
Sew the casing close to the fold, folding under as you go (Figure 9).
Be sure to stop the seam with enough room to thread the elastic (Figure 10).
TIP: Secure the seam at the start & finish - this sheet will need to survive a lot of washings!
3) Thread the elastic in the casing & sew the casing closed:
 |
| Figure 11 |
Secure a safety pin to 1 end of the elastic and secure the other end to the fabric (Figure 11).
TIPS:
1) Make sure the safety pin is small enough to fit in the casing with a little wiggle room. This is particularly important as you thread past each of your seams.
2) Be sure to secure the loose end of the elastic to the fabric. This will ensure it doesn't get pulled through the casing as you thread the elastic. Otherwise, you'd have to start all over :)!
 |
| Figure 12 |
 |
| Figure 13 |
Thread the elastic through the casing, gathering as you go.
Secure the 2 ends of the elastic overlapping them about 1" (Figure 12)
Sew the 2 ends of elastic together using a zig zag stitch (Figure 13). As you can see, this can be a little tricky given the narrow elastic, but thankfully this seam won't show :)!
And, the fit - super snug!
 |
| Simply Sweet collection by Riley Blake |
That's really it! Have fun choosing fabrics for a variety of them for your little guy or girl!

No comments:
Post a Comment