
Want to add some personality to your bedroom, a guest room or child's room? Try your own pillow cases!!

The fabric highlighted here is Simply Sweet by Lori Whitlock. I chose 2 different fabrics for the borders - thought it would be more fun for my little girl's room.

Or, a set that would really brighten up a guest room!
Things you'll need:
- Primary Fabric: 2/3 of a yard 44/45" fabric for each pillow case; if you're making 2, you'll need 1 1/3 yards; woven cotton, flannel & not too stretchy knits work best
- Contrast: 12-14" of 44/45" fabric for each pillow case; if you're making 2, you'll need 24-28" or 2/3-3/4 yard; Note: 12" is 1/3 of a yard; as this is the border, the specific size is up to you! I used 13 1/2" for each of my borders, so they'll fit plump pillows just as nicely as not so plump pillows.
Getting Started - Wash & dry the fabric
As all fabric shrinks some in the wash, pre-washing ensures the fit will be just as great after many washes! I also like to press my freshly washed fabric before cutting.
'Pattern' Layout & Cutting:
Just 2 pieces for each pillow case!
The instructions below are for 1 pillow case. Repeat for additional cases.
 |
| Figure 1 |
 |
| Figure 2 |
After washing, my fabric width was 44". To make cutting easier, I used my cutting board with built-in rulers & cutting lines. Fold the fabric with selvage ends together (Figure 1), lay out the fabric lengthwise with the folded edge along the ruler on the lower edge, and cut on the 22", 23" or 24" inch mark. (Figure 2)
TIP: I used a pillow case I'd made previously as a guide. You can do the same thing, if you're making cases for a King or other size pillow. Simply lay out the existing pillow case along the fabric fold & folder under the border. Be sure to leave about 1/2"-1" around the edges to for seam allowances.
 |
| Figure 3 |
 |
| Figure 4 |
2) Border: Cut a 44-45" by 12-14" piece of fabric for the main part of the pillow case
As above, my fabric width was 44" after washing. Fold the fabric with selvage ends together, lay out the fabric lengthwise with the folded edge along the ruler on the lower edge of the cutting board, and cut on the 12", 13" or 14" inch mark. (Figure 3)
TIP: If you're making more than 1 case, double the fabric before cutting to save time (Figure 4)
Assembly:
Just 4 simple steps!
1) Sew the side seams:
 |
| Figure 5 |
 |
| Figure 6 |
With right sides together, fold the case lengthwise and the border crosswise (Figures 5 & 6). Pin, if necessary.
 |
| Figure 7 |
 |
| Figure 8 |
Stitch each seam using 3/8-1/2" allowance (Figure 7). If you're using a traditional sewing machine, be sure to finish the seams using a wide zig zag stitch to be sure it holds up to plenty of washing! Press the seam allowance to one side (Figure 8).
 |
| Figure 9 |
 |
| Figure 10 |
With right sides together, place the border on the case, matching the side seam of each piece and pin (Figures 9 & 10).
 |
| Figure 11 |
 |
| Figure 12 |
Stitch each seam using 3/8-1/2" allowance (Figure 11). If you're using a traditional sewing machine, be sure to finish the seams using a wide zig zag stitch to be sure it holds up to plenty of washing! Press the seam allowance up toward the border (Figure 12).
3) Finish the Border:
 |
| Figure 13 |
 |
| Figure 14 |
Fold under the unfinished edge of the Border 1" & press (Figure 13).
Fold under and press 1/2 of this to create a nice finished look (Figure 14).
 |
| Figure 15 |
 |
| Figure 17 |
 |
| Figure 16 |
Fold over the Border to the wrong side of the Case, to just cover the border/case seam & pin (Figure 16).
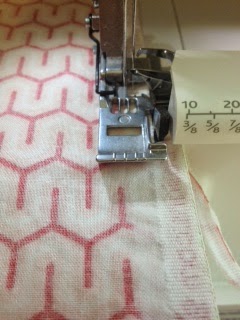
From the right side of the Case, stitch close to the Border/Case seam (Figure 17). Use your presser foot as a guide for a straight stitch.
 |
| Figure 18 |
 |
| Figure 19 |
Figures 18 & 19 show the nice end result - all seems hidden, making for a professional looking border!
4) Sew the bottom seam:
 |
| Figure 20 |
 |
| Figure 21 |
Stitch using 3/8-1/2" allowance (Figure 21). If you're using a traditional sewing machine, be sure to finish the seams using a wide zig zag stitch to be sure it holds up to plenty of washing!
 |
| Figure 22 |
 |
| Figure 23 |
Turn the case right side out, turning out each corner & press (Figures 22 & 23).
And, there you are! With just a little imagination, great fabric & some time, you can have perfectly personalized bedding!
 |
| Finished Pillow Cases in Lori Whitlock's Simply Sweet! |
 |
| And, another set well suited to a Guest Room |
No comments:
Post a Comment