
Baby receiving and swaddling blankets are soooo soft & super simple to make! Choose some great flannel, set aside an hour, and you've got a great set for your sweet pea OR a great Baby Shower gift!
You can never have enough receiving and swaddling blankets those first few months! I received so many as gifts for my little one, I was sure I'd would never use them all! But, alas I did, and my pre-schooler still uses them today, as blankets for all of her baby dolls. With so many soft flannel fabrics with terrific designs available today, you can really treat a new mom with a few unique blankets she & her little one will treasure!
Things you'll need:
- 1 yard 44/45" fabric (Primary fabric)
- 1 yard 44/45" fabric (Coordinating fabric)
- Flannel & not too stretchy knits work best
Getting Started - Wash & dry the fabric
As all fabric shrinks some in the wash, you'll want to pre-wash to ensure the final blanket is the size you intend. I also like to press my freshly washed fabric before cutting.
'Pattern' Layout & Cutting:
Just 1 simple square - times 2!
1) Cut a square of the size you'd like in your first fabric; I used 33 1/2" to match the size of blankets that works best for swaddling
 |
| Figure 1 |
 |
| Figure 2 |
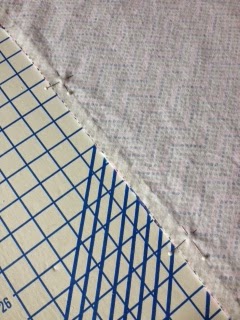
To make cutting easier, I used my cutting board with built-in rulers & cutting lines. Place the unfolded fabric with the selvage ends straight on your cutting lines (Figure 1). Measure 33 1/2" along one side and mark. I snip a bit with my scissors to mark the right length (Figure 2).
Measure 33 1/2" along the 2nd side and mark. Cut along along both sides to get a square.
2) Cut the same size square in your 2nd fabric
 |
| Figure 3 |
TIP: By placing it right side up, you get a head start on the next step of putting the front & back together.
 |
| Figure 4 |
 |
| Figure 5 |
Place the square you just created in your primary fabric over the 2nd fabric, right side down (Figures 4 & 5). As mentioned earlier, having the right sides together now gives you a head start when you attach the 2 pieces later.
TIP: If your fabric has a 1-way design/motif, be sure both squares have the motif facing in the same direction.
 |
| Figure 6 |
Cut around the top layer of fabric (Figure 6); this ensures both pieces are the same size and shape.
Assembly:
Just 2 simple steps!1) Attach the front & back
 |
| Figure 7 |
Pin all sides together and mark an area on one edge to leave open (Figure 7). This opening will be used to turn the blanket right side out.
 |
| Figure 8 |
 |
| Figure 9 |
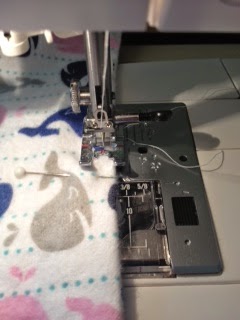
Stitch on all sides, leaving the opening marked earlier to allow you to turn the blanket right side out (Figures 8 & 9).
Use 3/8"-1/2" seam, and if using a standard sewing machine, be sure to finish the seam with a wide zig zag or other appropriate stitch. The blanket will need to survive a great deal of washings!
2) Top-stitch & stitch the opening closed
 |
| Figure 10 |
 |
| Figure 11 |
Carefully turn the blanket right side out. Be sure to push each corner out to create a nice slightly rounded corner & press (Figures 10 & 11).
 |
| Figure 12 |
 |
| Figure 13 |
Fold under the seam allowance of the opening, press & pin (Figure 12).
Top-stitch around all sides with a very narrow stitch (Figure 13).
TIP: Start sewing at the opening where you've folded under the seam allowance. I know I'm more likely to carefully stitch this closed with a nice neat stitch if I start here. Once I get sewing, I'm not likely to pay as close attention :).
TIP: I use my presser foot as a guide to be sure I keep a narrow, straight stitch.
 |
| Swaddling Blanket Pink/Blue Whales & Dotted Chevron Flannel from Riley Blake |
 |
| Super Soft Flannel makes a great Swaddling or Receiving blanket! |
That's really it! Have fun choosing fabrics for a variety of them for your little guy or girl!
No comments:
Post a Comment